
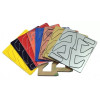
Alpha-X Pouch Inlays Silver
Ceci est un ensemble complet d'inlays de poche Alpha-X dans la couleur de votre choix.
Comprend des inlays gauche, droit et latéral. Selon l'endroit où vous montez le joint à boule, une partie de l'inlay ne sera pas utilisée.
This is a complete set of Alpha-X Pouch Inlays in the color of your choice.
Includes left, right and side inlays. Depending on where you mount the ball joint attachment, one inlay part will not be used.
7.
Guide pour l'installation des inlays de poche Alpha-X
Veuillez noter que ces inlays ont un film transparent protecteur sur leur face avant et un couvercle de ruban adhésif 3M au dos. Les deux doivent être retirés avant l'installation.
Pour installer les inlays, suivez ces étapes :
- Cassez soigneusement les pièces de leur cadre. Il y a plusieurs petits ponts qui les maintiennent en place et qui peuvent être cassés à la main.
- Si vous le souhaitez, vous pouvez utiliser un couteau pour nettoyer les queues laissées par les ponts, mais cela ne devrait pas être strictement nécessaire.
- Retirez le film transparent de l'avant, ainsi que le couvercle adhésif 3M de l'arrière.
- Positionnez les inlays sur leurs poches correctes dans le corps de la poche et ajustez-les en place.
Si vous souhaitez retirer TRADUCTION GÉNÉRÉE PAR IA, CERTAINS TERMES TECHNIQUES PEUVENT NE PAS ÊTRE TRADUITS CORRECTEMENT
Guide to Installing Alpha-X Pouch Inlays
Please note that these inlays have a protective transparent film on their front and a 3M adhesive tape cover on their back. Both should be peeled off before installation.
In order to install the inlays, follow these steps:
- Carefully break the pieces out of their frame. There are several small bridges holding them in place which can be broken by hand.
- If you wish, you can use a knife to clean off the tails left by the bridges, but this should not be strictly necessary.
- Peel off the transparent film from the front, as well as the 3M adhesive cover from the back.
- Position the inlays over their correct pockets in the pouch body and fit them in place.
Should you wish to remove the inlays after installation, you can do so thanks to the small holes drilled through the pouch body. In order to access these holes, you will need to remove all plastic spacers first. Then, using a sharp tool (like a small hex key), you can push on the inside of the inlay until it comes loose in the corner. Then, gently work it out of its pocket. Note that the inlay may break when removed.
Fiche technique
- Si hors stock, expédié sous:
- Nous consulter
- Couleur
- Gris

Avis (0)